
You've reached the Virginia Cooperative Extension Newsletter Archive. These files cover more than ten years of newsletters posted on our old website (through April/May 2009), and are provided for historical purposes only. As such, they may contain out-of-date references and broken links.
To see our latest newsletters and current information, visit our website at http://www.ext.vt.edu/news/.
Newsletter Archive index: http://sites.ext.vt.edu/newsletter-archive/

As much as 60% of the final yield potential for a wheat crop is determined at planting. Seeding too thinly, using poor quality seed, and uneven stands result in end of season yield losses that cannot usually be overcome.
It is important to plant on a seed per foot basis rather than on a weight per acre basis. Since wheat kernel size is known to vary by as much as 50% (12,000 - 18,000 seeds per lb.) between varieties and years, it's easy to see how planting rates in terms of bushels per acre or lbs. per acre without consideration of the seed size could result in low populations that reduce yields or high populations that increase seed cost. Planting 2 bushels per acre of seed that has 12,000 seeds per lb. would result in a seeding rate of 33 seeds per square foot; conversely, planting 2 bushels per acre of seed that has 18,000 seeds per lb. would result in a seeding rate of 50 seeds per square foot. Big difference!
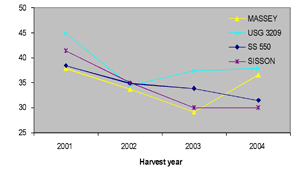
Differences in the number of seed per lb. exist because seed weight or kernel plumpness is determined primarily by the environment in which it is grown and by the degree of cleaning. An example of this high degree of variability is illustrated by the following graph showing 1000 kernel weights for 4 wheat varieties over the last 4 years. All seed was cleaned to the same standard each year. Seed size obviously varies by variety, but also by year. Because of the conditions last spring that resulted in poor grain fill in many areas of the state, it's likely that some seed wheat produced in Virginia will be smaller than normal resulting in higher numbers of seed per pound this year. But you will not know unless you check.
Previous research in Virginia has determined that optimum yields result from a plant population of 22-25 vigorous plants per square foot. To reach this goal, multiply this value by the seed germination. This will account for those seed that do not emerge. Actual seeding rates will likely need to be 30-35 seeds per square foot.
The following instructions indicate how to calibrate a drill for a particular seed lot.
Step 1: Select the proper seeding rate/row foot for your drill row width.
| Row spacing (inches) | Seeding rate/row foot |
|---|---|
| 6 | 18 |
| 7 | 20 |
| 8 | 22 |
Step 2: Calculate the number of seeds required in 50 feet of row. For example, in 7.5 inch wide rows and planting on time, an appropriate seeding rate would be 22 seeds per drill-row foot times 50 feet, which equals 1100 seeds planted every 50 feet of each row. Count 1100 seeds of each variety and put the seed in a graduated tube such as a rain gauge, or a clean tube or cup. Mark the level of the 1100 seeds in the tube.
Step 3: Hook a tractor to the grain drill so that the drive wheels of the drill can be raised off the ground with a jack, and the drive gears can be engaged. Raise the drive wheel so it clears the ground and turn the wheel several revolutions to be certain that everything is turning freely. Check all drill spouts and make sure there are no blockages.
Step 4: Determine the number of revolutions the drive wheel must turn to travel 50 feet. This can be done in one of two ways.
Option a. Measure the distance around the drive wheel. The distance can be measured directly with a tape measure.
Option b. Measure 50 feet in a field and count the number of revolutions the drive wheel makes in 50 feet. Always check the number of tire revolutions per 50 feet on soil conditions similar to those that will be experienced during planting.
Step 5: To calibrate the drill:
Visit Virginia Cooperative Extension